Tech Blog
Friday, 7 February 2025
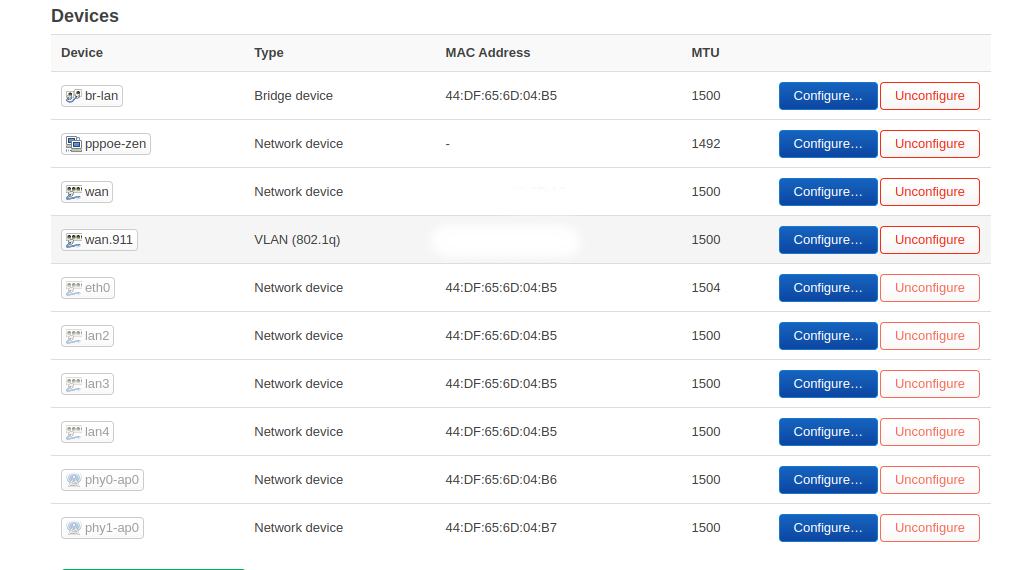
OpenWrt setup for Zen Internet / City Fibre
Tuesday, 7 February 2023
Virgin Media DNS hijacking
- setup a £5/month VPS & run bind9 on it
- link the home gateway & VPS via wireguard & point all DNS upstream to this VPS
- add iptables rule to PREROUTE plus usual masquarding rules on wireguard interface
Thursday, 2 February 2023
External USB disk storage for Zoneminder
Its often useful to have an external storage for ZM videos , stills and events
Create usb disk , partition & format with label ZMDATA
create a directory /var/lib/zmdata
edit /etc/fstab and add entry :
LABEL=ZMDATA /var/lib/zmdata ext4 defaults 0 0
mount the disk and create directories :
/var/lib/zmdata/zoneminder/{events,images}
edit / create a new file /etc/zm/conf.d/03-usbmount.conf with contents
ZM_DIR_EVENTS=/var/lib/zmdata/zoneminder/events
ZM_DIR_IMAGES=/var/lib/zmdata/zoneminder/images
set permissions, chown -R 33.33 /var/lib/zmdata/zoneminder/
add the new storage and delete default, restart zoneminder
Saturday, 12 March 2022
systemd service inside a namespace
Network namespaces are a very versatile feature in Linux. Here we implement a service (dhclient) in an isolated namespace.
This implementation was tested on a NanoPi R4S - 1GB .
This kit has two gigabit ethernet interfaces. eth0 is the wan interface and at startup systemd service moves this interface to red namespace and linked by a veth pair to the main namespace.
There are three files involved in this systemd approach. Two template files and one service file.
netns@.service
[Unit]
Description=Named network namespace %i
StopWhenUnneeded=true
[Service]
Type=oneshot
RemainAfterExit=yes
PrivateNetwork=yes
ExecStart=/sbin/ip netns add %i
ExecStart=/bin/umount /var/run/netns/%i
ExecStart=/bin/mount --bind /proc/self/ns/net /var/run/netns/%i
ExecStop=/sbin/ip netns delete %i
ExecStop=iptables -F -t natattach-eth0@.service
[Unit]
Description=Attach eth0 to Named network namespace %i and link with a veth pair
Requires=netns@%i.service
After=netns@%i.service
PartOf=red.service

[Service]
Type=oneshot
RemainAfterExit=yes


ExecStart=/sbin/ip link set eth0 netns %i
ExecStart=/sbin/ip netns exec %i ip l set up dev eth0
ExecStart=/sbin/ip link add veth-%i0 type veth peer name  veth-%i1
ExecStart=/sbin/ip link set veth-%i1 netns %i
ExecStart=/sbin/ip netns exec %i ip a a 192.168.99.1/24  dev veth-%i1
ExecStart=/sbin/ip a a 192.168.99.2/24  dev veth-%i0
ExecStart=/sbin/ip l s up dev veth-%i0
ExecStart=/sbin/ip r a default via 192.168.99.1  dev veth-%i0
ExecStart=/sbin/ip netns exec %i ip l set up dev veth-%i1
ExecStart=/sbin/ip netns exec %i ip l set up dev lo
ExecStart=/sbin/ip netns exec %i iptables -t nat -A POSTROUTING -o eth0 -j MASQUERADE
ExecStart=/sbin/ip netns exec %i sysctl -w net.ipv4.ip_forward=1
ExecStart=iptables -t nat -A POSTROUTING -o veth-%i0 -j MASQUERADE
ExecStart=sysctl -w net.ipv4.ip_forward=1


ExecStop=/sbin/ip netns exec red iptables -F
ExecStop=/sbin/ip netns exec red iptables -F -t nat
ExecStop=/sbin/ip netns exec %i ip a f  dev veth-%i1
ExecStop=/sbin/ip a f 192.168.99.2/24  dev veth-%i0
ExecStop=/sbin/ip link delete veth-%i0
ExecStop=/sbin/ip netns exec %i ip l set down dev eth0red.service
[Unit]
Description=Systemd service for red namespace

# Require the network namespace is set up
Requires=netns@red.service
After=netns@red.service
JoinsNamespaceOf=netns@red.service

# Require the interface is set up
Requires=attach-eth0@red.service
After=attach-eth0@red.service

[Service]
Type=simple

PrivateNetwork=true
ExecStart=/sbin/ip netns exec red /sbin/dhclient -4 eth0


[Install]
WantedBy=multi-user.target
when systemctl start red.service is invoked, the "Requires" stanza starts attach-eth0@red.service & netns@red.service.
footnote : This method may not be very processor efficient.
Monday, 27 December 2021
Rock3 - a very capable router board
This is the $35 SBC, Rock3 from Radxa.
ROCK3 features a quad core Cortex-A55 ARM processor, 32bit 3200Mb/s LPDDR4, with a 2-lane PCI-e 3.0 m.2 M key and and a PCI-e 2.0 E key slot, a gig Ethernet port and a host of other interfaces.
The PCI-e 3.0 , 2x port is capable of 650MB/sec write speed on a PCI 3.0 nvme device. A quick check as a nas / gitea server reveled the processor maxing out on ssh/git process, ending up around 30 MB/s write speed. Nevertheless this kit is the prime candidate for the edge router.
The second ethernet device from aliexpress will go on pci-e 3.0 interface. The initial testing using a standard RTL8111 PCI network card sustained a throughput of 940Mbit/s.
An Atheros QCNFA222 is used as the 2.4 G access point device for initial tests. Atheros devices always proven to be rock solid and the widest interoperabilty
Software
The relationship of each item is explained in this image from Rockchip :
Our boot process follows boot flow 2, hence we need to :
dd the idbloader.img to the SD card at 0x40 (seek 64)
u-boot.itb goes to 0x4000 (seek 16384)
The GPT layout of the disk starts from sector 32768 (0x8000); The u-boot environment can be squeezed at 0x6000.
The rk36x..bin file is for the rkdeveloper tool use (maskrom mode) (top left path)
Wireguard performance:


